$25 DIY Bathroom Countertops
Yes, you heard me right and no, I’m not joking around. I recently took on a project to update and clean up the look in my bathroom with these DIY bathroom countertops.

DIY Bathroom Countertops
Now I’m far from being a do-it-yourself diva, but I have to admit I’m pretty proud of myself with how well this turned out especially when this was a spur of the moment – last minute project and we all know how those usually turn out.
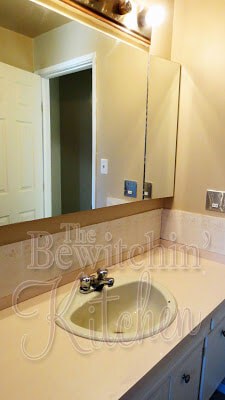
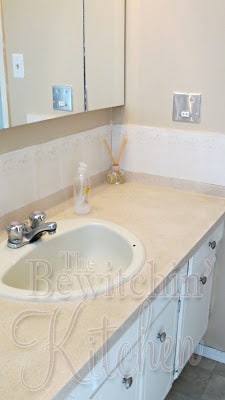
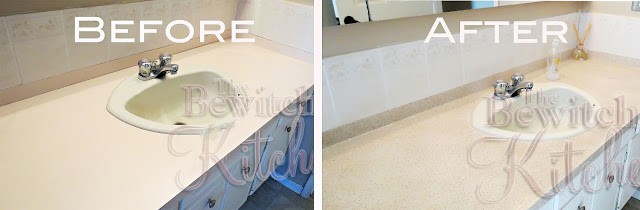
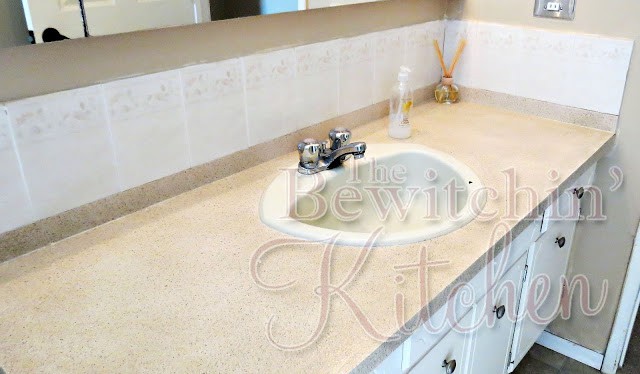
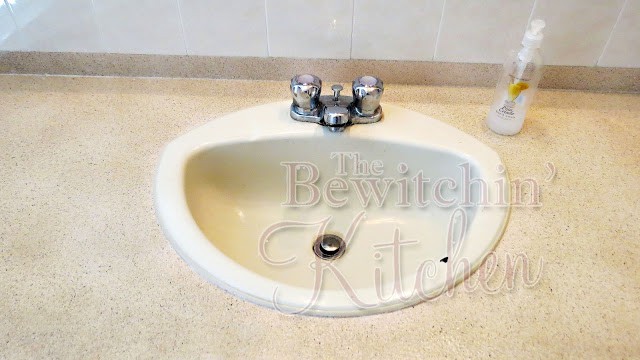
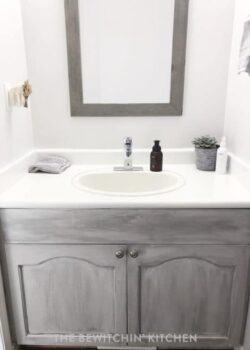
I’m pretty sure that my counter top color was once called “dusty rose”, very 90’s and very ugly. I couldn’t get the color to truly show in the lighting, it’s a lot pinker than that, it made my skin crawl. Now it’s clean, modern and my bathroom feels a lot more “airy”. My next $20 bathroom projects will be to paint the ceramic tiles and the vanity (posts will follow).
Also see how I painted my kitchen cabinets.
DIY Bathroom Countertops – What You Need:
This post contains affiliate links
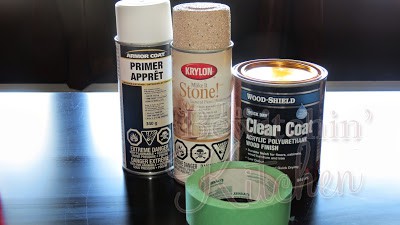
- Spray primer
- Krylon Make It Stone in your color of choice
- Polyurethane
- Painters tape
- Newspaper or whatever can be used to protect the floor
- Mini foam roller & tray
- Sanding block or paper medium grit
DIY Bathroom Countertops -How To Do It:
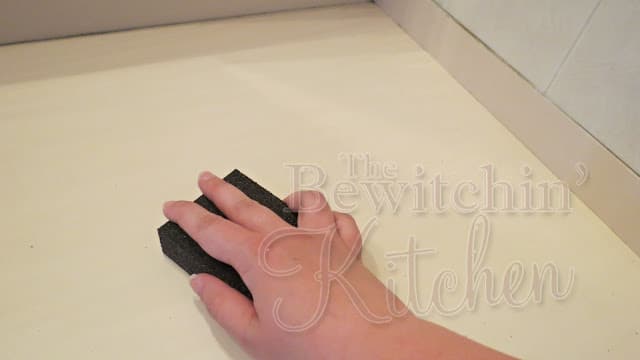
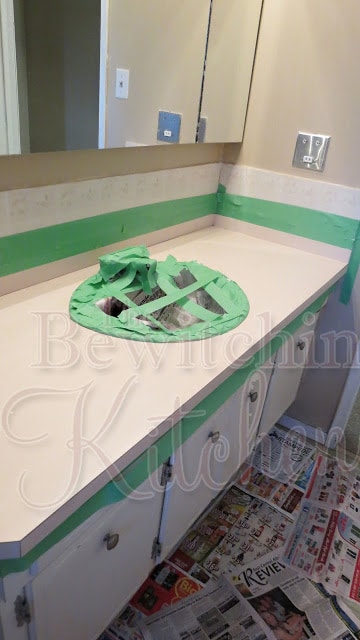
- Begin with a clean surface to work with and take a sanding block (or paper) and lightly sand to rough up your working surface. You want the primer to be able to stick. I was surprised with how much of the pink disappeared as I sanded, leaving a lighter (almost white) base to work with. Don’t forget to sand the edges of your counter top and the “banner” around it. Wipe off any additional dust.

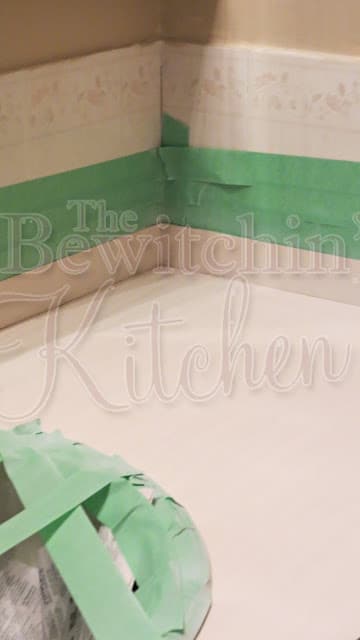
- This part is really important, probably the most important step in this whole process. You need to prep! It took me a good fifteen minutes, and it was tedious, and it sucked but if I didn’t there would have been a huge mess to clean up (or sand off) when I was done and that would have taken even longer. I put paper in the sink and taped it down with painters tape (not the nicest job, but it worked), I lined the floor with newspapers/flyers, and taped the tiles and vanity surrounding the counter top.

- It’s time to start spraying. Take your spray primer and evenly apply it to the countertop. I had to do two coats for it to cover the area to my liking. I used a white primer since I used a beige in my next step, however; if you are doing a darker countertop you can use a grey primer, or whatever other colors you can find. Make sure all the windows (and even outside doors) are open. The fumes are terrible and I only had my bathroom window open, we camped out downstairs for hours until it was liveable upstairs. Let dry overnight.

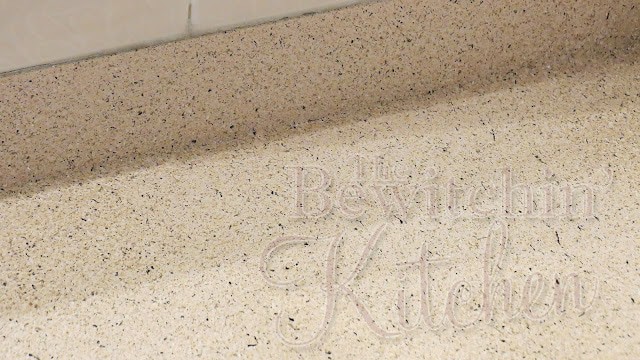
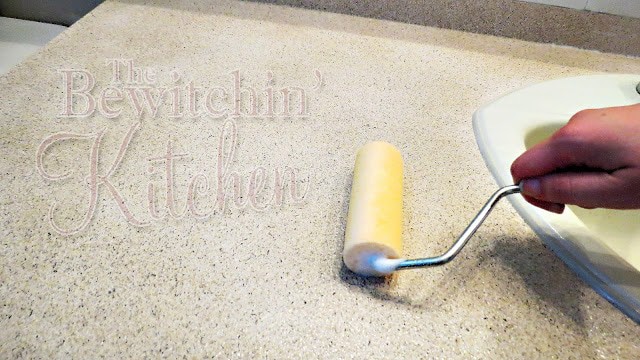
- The next morning take your choice of Krylon Make It Stone spray paint and start spraying. Don’t spray in lines, that was my first mistake that I had to fix. Do short bursts to cover your to get the desired effect. Let first layer dry for an hour and repeat until can is empty. If you have a bigger area, I recommend more then one can. It doesn’t last long, and this is something I wish I did. DO NOT touch this paint while it dries, you will ruin the finish. I let this dry for eight hours, or until hard when knocked on.

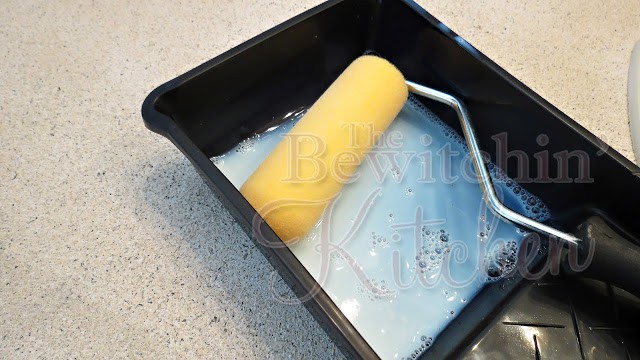
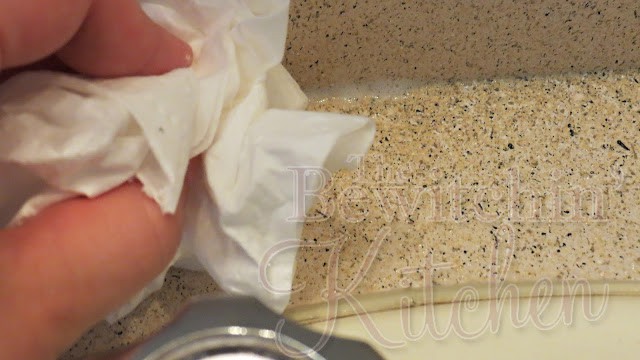
- Now the fun part (I’m being sarcastic). Apply the polyurethane in think layers with the foam brush. Cleaning up with paper town or tissue in between each application where it built up. Let dry for two hours. Repeat this at least ten times. I did eleven and I’m feel like I could still do more. I do find this counter top durable and I have cleaned it with Lysol wipes, however I haven’t scrubbed two hard. I think if I was to do a few more coats of polyurethane I would be more comfortable. But that’s the great thing about it, you can always do more whenever you want. You use very little of the can and it’s always there for reapplying.
Looking for more great ideas? Click here to follow me on Pinterest!
Visit Randa | The Bewitchin’ Kitchen’s profile on Pinterest.


Interesting! I stumbled on your blog a little while ago…I live in the same area as you. I have been in to ask in the paint store if there is anything I can do to paint bathroom tiles and was told no deal. So I am looking forward to your next post…Thanks for this!
Tanis
What a difference!! I’ve heard of this stuff and have been dying to try it on something hehe. Never thought of countertops! Great idea 🙂
We’ve used this stuff for many different things and would have never thought to use in the bathroom! We re-did our bathroom last winter and all I longed for was a new counter top. Thinking I got a new project when I get home!
That looks awesome!
You did a great job! I have to admit that my husband is a cabinet and furniture maker so when I need a new counter top I get a new counter top but not everyone has a live in trades person 😉
You’ll have to update us in a few months and let us know how it’s holding up!
well aren’t you miss crafty!!! you rocked that countertop!!! good job mama! I love it!
It looks great! And what an awesome price point.
Question..just for confirmation..this IS laminate countertop correct? Hard to tell..just want to make sure before I decide to tackle this 😉 Thanks! Shell
Hi Shell. Yes, it was a laminate, or I guess still is 🙂
It’s been almost 10 months and it’s still holding up great.
Hi Randa, looks very nice. Funny I was just looking at this stone spray paint tonight at HD. The cap felt rough so I did not buy it thinking that it wouldn’t be a good choice to redo my laminate countertop. May I ask how it turned out? Is it a rough or a smooth surface? Thanks Lisa
Hey Lisa,
Yeah it definitely not bad for $25! It’s not completely smooth, but not near as rough as the lid on the can. It’s easy to run your hands over (without getting exfoliated lol) I think if it was sanded lightly it would be alright.
It’s 8-9 months later and it has held up well to scrubbing with lysol wipes and Green Works cleaners.
thank you for the info. The texture was a concern for me thought it might be too lumpy for a countertop. So glad I found your post thanks again:)
You’re welcome 🙂 Happy DIY!
Love your post. I was thinking of just doing just the back splash part of the kitchen, presently have ugly blue bathroom looking tiles. Concerning the “feel”, wouldn’t it be more smooth the more coats of polyurethane you put on it?
I love this DIY! I used it in my own bathroom 🙂
Thanks for the project idea!!
Do you think this will work on a counter top that has the sink built in?
You bet it will!
Your sink looks great! You inspired me to do mine. It turned out great!!!! I sealed it with Envirotex instead of poly and i absolutely LOVE it. Thank You!!!!!
I am so thrilled it worked for you 🙂 What color did you do? I moved into another house now and was thinking about doing it again.
Pingback: Studio All Day$25 DIY Bathroom Countertops - The Bewitchin' Kitchen | Studio All Day
I love your post, very detailed and easy to follow. I was wondering if your counters are still holding up. I went to Lowes to get the materials and asked if this process will hold up to everyday use. He pretty much said well if you were to buy a wooden kitchen table, it looks great at first but overtime, it starts to wear away and lose its shine. I walked away after thay but I just want to know if they still look as good as they did after you completed the process. Thanks in advance!
Hi Monique,
I no longer live in that house but when I left in April (a year after I did it) they still looked the same and had shine.
It looks SO good! The difference is seriously amazing. I can’t wait to try this on our bathrooms once the holidays are over and I have a bit of free time again.
Wonderful transformation of those counter tops! It makes a big difference from the humdrum before to the elegance of the finished project. Well done and thanks for the tips!
looks great! When you do the final step with the polyurethane, do you wait 2 hours between each coating? Just wanting to clarify, thanks
Yes, I waited the two hours in between (if I remember correctly). I followed the instructions on the can. If your can says something different, go with that 🙂
Did you use a water or oil based sealant?
Hi Jenna,
I believe it was a water based.
question: what color paint was your “make it stone”? I see one called “charcoal sand” listed. wondering if thats what you used or something different. thanks
Hi Dayna,
It’s been a few years since I did this project and I don’t quite remember. It may have been “sandstone” but I couldn’t wrong. I only had three colors to choose from at my local store and I took the most beige’ish color.
This looks fantastic. Can I ask how it held up? Do you think it would work in the kitchen? I am excited to think how good my kitchen would look if this worked.
I just did this to both of my bathrooms, what a great way to update ! mine turned out fantastic !
That is awesome to hear! Isn’t it great to find such a cheap and easy update?
Thanks for the great idea, I would have never thought of that!
I know this post is old, but I just came across it today. The counter-tops in my kids’ bathrooms are some kind of stone. It looks like marble and is a dark blue swirly color. YUCK! Will this technique work on stone?
I can’t say 100%, but it should. However, I highly recommend the post that I have linked within this post to the Giani Granite. It looks better, but if $25 is your budget then give it a try.
I come back to this post so often. My husband has had some health issues but is finally feeling well enough that we are getting some home repair/updates done. I am going to give this a go this week, even if it doesn’t hold up forever it is a great holdover until we can replace the vanity and countertops. Thanks for the idea and instructions.
Hey Melissa,
I’m glad to hear it! Exactly, this is a great “inbetweener” project.
First day on this site. I’m moving into a townhouse and the bathroom countertop is awful. I’m definitely going to try this. Any idea how the black granite looks when done? I was thinking about doing the stick and peel marble paper but after the reviews they say it’s a pain in the butt and I’m definitely not handy. This seems like a much better option. I can’t wait to read further posts from you and everyone else.
Hey Debbie, I recommend checking out Giani Granite.
Hi. I plan on doing this but my sink and countertop is all one mold. No lip or separate sink to delineate the edge. Do you think I could paint the sink as well since it’s the same material as the countertop? I’m guessing no but it might look weird if I don’t since there’s no edge.
Hey Kellie,
I’m not sure so I don’t want to give you the wrong answer! I’d check with a brand called Giani Granite and email them to see if you can do that (the quality of their stuff is so much better).